How to Make Stickers: A Step-by-Step Guide in Design Space
Stickers are a fun and creative way to personalize anything!
Use stickers to:
- Decorate personal items like laptops, notebooks, and water bottles
- Personalize greeting cards and letters
- Promote your brand or business with logo stickers
- Seal envelopes
- Raise funds for causes or organizations by selling stickers (I’ve had people use my semi-colon butterfly stickers to raise money for mental health organizations)
- Mark events on your calendar, from doctor’s appointments to birthday parties
- Design unique party favors by attaching stickers to small gifts or treat bags
- Decorate party supplies and invitations for special occasions
- Label and organize items at home, such as jars or containers
- Customize cars, motorcycles, or bicycles with unique designs
- Use stickers for identification, like name tags at events
- Create arts and crafts projects
- Implement a reward system for children or students with a sticker chart
- Collect travel stickers as souvenirs and display them.
- Label food at parties with important information, such as possible allergens
- Express your personality
- Enhance scrapbooking projects
- Customize your smartphones or tablet
- Use stickers to organize and categorize files or documents
- Add stickers to your journal or planner to decorate and personalize your pages
Materials and supplies needed:
Full size Cricut Machine such as the Explore, Maker, or Maker 3
Printable glossy vinyl sticker paper
A high-quality printer – I absolutely love my Epson XP-15000 Wide Format Photo Printer
Images in PNG or JPG format you’ve created
* Links to products are for your convenience in finding tools and materials, however, they are affiliate links.
As an Amazon Associate, I earn from qualifying purchases. *
My cousin designed her own stickers in Canva. She wanted to cut them out using her Cricut and Print then Cut.
She wanted to make them into a circle, so I created a video showing her exactly how to do it. I also went through sizing and test cuts.
You can watch the video here if you can’t see it below.

I don’t want to create my own images. Can I find them somewhere?
Definitely! Creative Fabrica is a perfect place to start.
They’re giving 10 free images to anyone who signs up for a trial account through my link.
For some inspiration:
I use stickers like these on our big family calendar so everyone can see special events. Planner stickers – Daily Task Planner Stickers
Use these Kawaii Medicine Bottles as reminders to refill your prescriptions or take your meds.
My five-year-old loves kittens and these Halloween Watercolor Kittens are just adorable!
I’m going to use this Labradoodle design to make a sticker for my cousin Maasa and her dog Sadie.
They have stained glass Labradoodles too! Maybe for another project.
My daughter had her tonsils out yesterday. I was looking for a flamingo (her favorite animal) and found this to make into a sticker for her laptop.
This flamingo is perfect for anyone who enjoys wine!
Squirrels riding motorcycles? I have so many ideas…..
As you can see, there is a plethora of images you can use!
Got an image you’d like to use now? Go to step 2.
Here’s a quick summary of the video if you prefer the written instructions.
Step 1: Design Your Stickers
To start, create your sticker designs using Canva or any other graphic design software. Save your design as a PNG or JPG file. PNG files have a transparent background, so Cricut will cut out around the edge of your design, no matter what the shape is.
Step 2: Upload your Designs
Upload your designs to Cricut Design Space.

If necessary, use the background eraser tool in Design Space to remove any unwanted backgrounds.

Step 3: Creating Circular Stickers
If you want circular stickers but have a square image, follow these steps:
Insert your design onto the canvas in Design Space.
Create a circle shape close to the desired size.
In the Operation Menu, change the shape to a Guide.

Select both the circle and your design, and click “Center” to align them.
Slice the design with the circle shape, delete any unwanted parts, and remove the guide.

Step 4: Add Borders
If you want to add a border to your sticker, insert a shape to create the desired border.
Adjust the shape’s size and position to achieve the desired border width.
Customize the color of the shape or leave it white for a classic sticker look.

Align and flatten the shape with your design.

Step 5: Testing and Resizing
Before printing a whole sheet of stickers, it’s essential to test the size.
I find that what “seems” right when you measure can be very off when you actually use the sticker. Print your design on regular paper in several different sizes to test it.

Step 6: Arrange the Stickers in rows
If you want to arrange multiple stickers on a page, duplicate and attach them for efficient cutting.

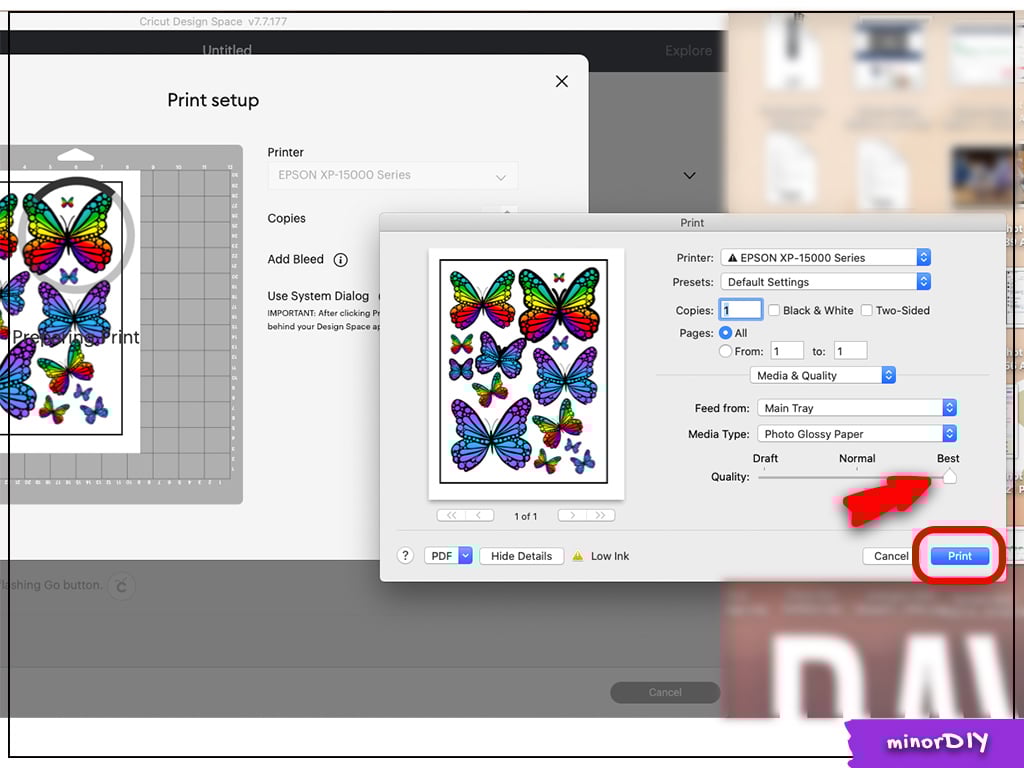
Step 7: Printing and Cutting
Select your printer in Design Space.
Always enable the bleed option if your stickers do not have white borders.
Use System Dialog so you have more options.

The system dialog screen will pop up in the center of your screen, often behind Design Space. Move Design Space out of the way.

Choose the appropriate paper type and always use the “best quality” setting.
It’s so much fun to create your own stickers! By following this step-by-step guide, you can transform your designs into professional-looking stickers using Design Space and your Cricut.
Looking for more Print Then Cut and/or Sticker tutorials? Try these.
💜 How to use Print Then Cut in Design Space
💜 Create A Custom Material Setting On Your Cricut For Zicoto Sticker Paper
💜 How to use your Canva designs in Design Space
💜 Sticker and Print then Cut Live Q&A Call Replay
💜 How to maximize print then cut area in Cricut Design Space
Questions? Leave them in the comments below.
💜 Share your thoughts by leaving a comment! 💜