Surprise and Delight: How to Make an Easy Twist and Pop Birthday Card with Cricut’s Print then Cut and my free SVG

This design uses Cricut’s Print then Cut feature for the rainbow Happy Birthday pop-up.
To create the Twist and Pop birthday card, you’ll need:
- the free SVG file – it’s design #103 – Twist and Pop Birthday Card SVG in the Free Files Folder
- (If you don’t have the password for the free files, fill in the form at the bottom of the page and it will be emailed to you.)
- a cutting machine such as the Cricut Maker or the Explore Air
- scoring tool – either the scoring stylus or scoring wheel
- bone folder to burnish the score lines
- Glue – my favorite for this card is Bearly Art Precision Craft Glue
* Links to products are for your convenience in finding tools and materials, however, they are affiliate links.
As an Amazon Associate, I earn from qualifying purchases. *
How to use the free Twist and Pop Birthday Card SVG in Cricut Design Space
A few of you were having problems doing the flattening part, so I recorded a quick video on using the SVG in Design Space.
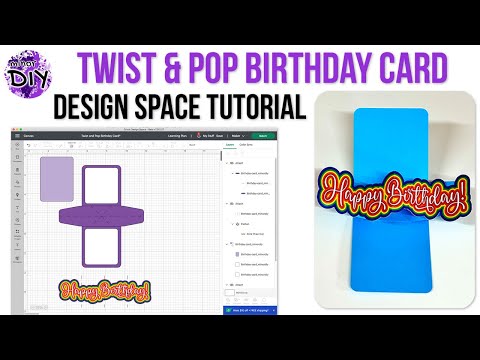
Unzip the file, and upload the SVG file to Design Space.
Ungroup the SVG.
Click the rainbow “Happy Birthday” message to highlight it.
Click on the Ungroup button. ** Don’t miss this step! You have to Ungroup this specific group, or you can’t set the score lines. **

Select all of the Happy Birthday message layers, and click on the Flatten button. (This turns all of these layers into one Print then Cut image.)

Right-click on the three lines in the layers panel and choose Bring to Front.

Hold down your shift key and click on the three lines as shown to highlight them.
Choose Score from the Operation menu.

Now, Attach each score line to the piece below it by selecting both and clicking the Attach paperclip button.

Your card is ready to cut!
The light purple piece is for the font cover; the white pieces can be used for a blank space for a message or a block of decorative paper.

Cut and score the project.
How to assemble the Twist and Pop Birthday Card
I’ve made a quick Instagram Reel to show you exactly how to do this! (It’s really quick. One minute!)
(Watch it here if it isn’t loading in this page.)
Questions? Leave them as a comment below!
Anonymous says
I didn’t receive the email :
I signed up with 2 different emails and I still didn’t get it. I just need to access the free files that you so kindly shared with us!
Emily says
Hi! Please email me at emily @ minordiy.com so I can help.
Anonymous says
Brilliant! Thank you for sharing it.
Emily says
You’re welcome!! It was a ton of fun.
Jay says
What a cute card. I made one for a family member. Thanks for the assembly video because I don’t think I would have figured out how to put it together without it. Thanks for the instructions and the file!
Emily says
Yes – that mechanism can be tricky!
Jennifer Lamb says
Thank you so much for this card design and video! I’m making one for a friend right now! 🙂
Martha B says
Thanks so much. I love this card. It took me awhile to figure out how to flatten it, but I did it.
Emily says
I’m so glad you mentioned that was difficult/confusing! Someone else said that too, so I made a screen recording of it and added it to the post.
Cherie Gibson says
Wow! Such an AWESOME card! Thanks for sharing!
Emily says
Thanks! I’m glad you like it.