Privacy & Cookies: This site uses cookies. By continuing to use this website, you agree to their use.
To find out more, including how to control cookies, see here: Cookie Policy

minorDIY

  • About
    • Frequently Asked Questions
    • Contact
    • Home
  • SHOP
  • Free files
  • Printables & Hand Cut Projects
  • Holidays
    • Halloween
    • Christmas
    • Birthdays
  • Projects
    • Cardboard
    • Photo Gifts
    • Cricut Projects
    • Super Easy & Kid Friendly
    • Shirts
    • Ear Savers
  • Explosion Boxes
  • Cards

How to Upload a SVG to Cricut Design Space

11.11.2021 by Emily // 14 Comments

8 shares
  • Share
  • Tweet

If you are a new Cricut user, the steps to add files to your project can be confusing. (Why do we have to hit an Upload button three different times?)

Below are step-by-step instructions on how to upload an SVG to your new project in Cricut Design Space.

First, you’ll download a ZIP file. The project tutorial explains which file and where you can download it from. This file contains the SVG and perhaps some other versions of the same file.

Double-click the ZIP file to open the folder. The files you see now are the files to upload to Cricut Design Space.

How to upload an SVG to Cricut Design Space

1) Open Cricut Design Space by double-clicking the icon on your computer.

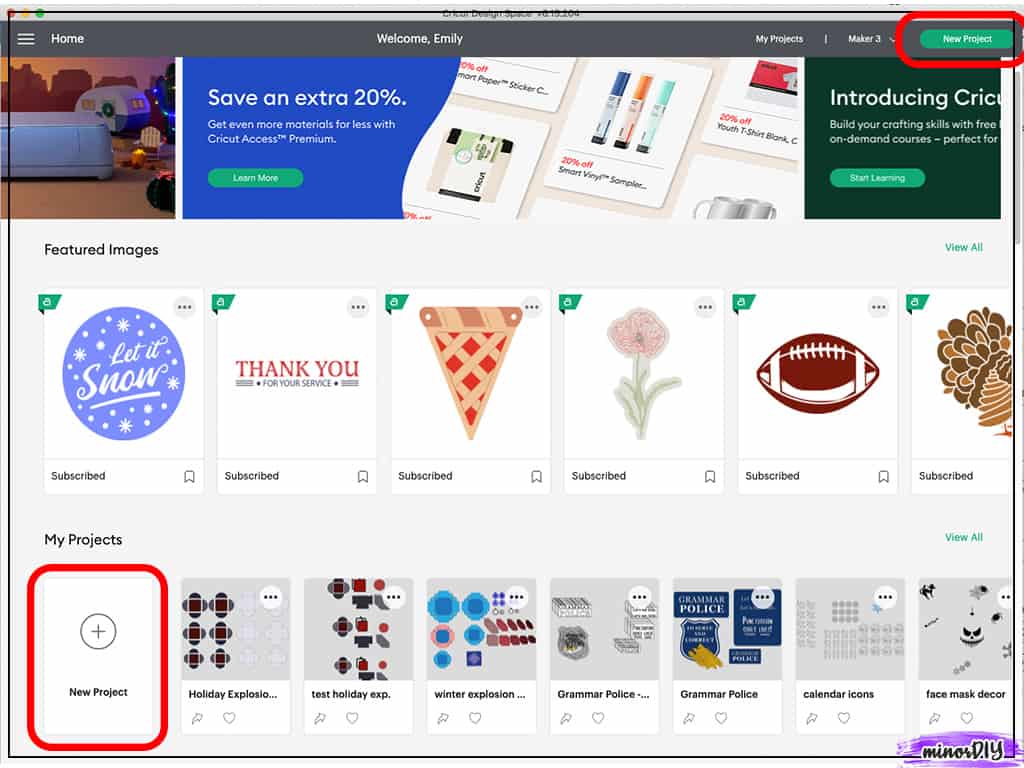
2) Create a new project by clicking either of the buttons outlined in red in the image below.

This is a Cricut Design Space print screen. The instructions are: Create a new project by clicking the green New Project button.

3) Click on the Upload button.

This is a Cricut Design Space print screen. The instructions are: Click on the gray Upload button.

4) Click on the next Upload Image button.

This is a Cricut Design Space print screen. The instructions are: Click on the next Upload Image button in the middle of the screen.

5) You can either click the Browse button and navigate to the SVG file you want to upload, or you can drag and drop the file from another window into the upload space.

This is a Cricut Design Space print screen. The instructions are: You can either click the Browse button and navigate to the SVG file you want to upload, or you can drag and drop the file from another window into the upload space.

6) The SVG file preview is shown on the left. Click on the Upload button in the bottom right corner.

This is a Cricut Design Space print screen. The instructions are: The SVG file preview is shown on the left.  Click on the Upload button in the bottom right corner.

7) Select the image you just uploaded. (You can select multiple files by clicking the mouse on each preview.) Click the Add to Canvas button.

This is a Cricut Design Space print screen. The instructions are: Select the image you just uploaded.   Click the Add to Canvas button.

8) The first step after the SVG has been added to your project is always to UnGroup it.

This will allow you to change colors, specify different operations for each object (such as score, draw, engrave, or perforate,) and Group and Attach each individual layer as needed.

This is a Cricut Design Space print screen. The instructions are: The first step after the SVG has been added to your project is always to UnGroup it.


After this step, start following the tutorial for that specific project.

Many websites offer free SVG files and tutorials – including mine.

Sign up below to access the Free Files Folder, which contains all of the SVGs that I’ve created to share.

Categories // Tutorial

Trackbacks

  1. DIY Holiday Explosion Box Gift » minorDIY says:
    November 12, 2021 at 9:45 pm

    […] (Click here if you need to see step-by-step instructions for how to upload an SVG to Design Space.) […]

    Reply
  2. "Happy" New Year card » minorDIY says:
    January 10, 2022 at 3:27 pm

    […] Upload the “card-base-and-envelope_minorDIY.SVG” file to Design Space. (Need a refresher? Click here.) […]

    Reply
  3. Gal-entine Heart Explosion Box » minorDIY says:
    January 14, 2022 at 12:23 pm

    […] (Click here if you need to see step-by-step instructions for how to upload an SVG to Design Space.) […]

    Reply
  4. How to make a Magical Unicorn Pop-Up Card » minorDIY says:
    January 29, 2022 at 6:53 pm

    […] from the Free Files Folder, then unzip it and upload it to your cutting machine’s software. (Read this tutorial if you need help uploading to Design […]

    Reply
  5. How To Make a Gift Box with Pop-Up Cubes » minorDIY says:
    February 6, 2022 at 9:48 pm

    […] the SVG Pop-Up Cube to Design Space. (Here’s a quick tutorial if you need help with […]

    Reply
  6. Card Base and Envelope » minorDIY says:
    February 10, 2022 at 2:56 pm

    […] Upload the “card-base-and-envelope_minorDIY.SVG” file to Design Space. (Need a refresher? Click here.) […]

    Reply
  7. Never forget - infant loss memory card » minorDIY says:
    May 7, 2022 at 1:23 pm

    […] 1) Upload both files to Cricut Design Space. (Here’s a refresher tutorial on uploading.) […]

    Reply
  8. Mothering - free card for non-traditional Mother's Day » minorDIY says:
    May 7, 2022 at 1:31 pm

    […] 1) Upload both files to Cricut Design Space. (Here’s a refresher tutorial on uploading.) […]

    Reply
  9. Give this card when Mother's Day is hard » minorDIY says:
    May 7, 2022 at 2:00 pm

    […] 1) Upload both files to Cricut Design Space. (Here’s a refresher tutorial on uploading.) […]

    Reply
  10. Card for a Difficult Past Relationship » minorDIY says:
    May 7, 2022 at 2:05 pm

    […] 1) Upload both files to Cricut Design Space. (Here’s a refresher tutorial on uploading.) […]

    Reply
  11. Always a Mother » minorDIY says:
    May 7, 2022 at 2:11 pm

    […] 1) Upload both files to Cricut Design Space. (Here’s a refresher tutorial on uploading.) […]

    Reply
  12. Not the easiest relationship card printable » minorDIY says:
    May 7, 2022 at 2:21 pm

    […] 1) Upload both files to Cricut Design Space. (Here’s a refresher tutorial on uploading.) […]

    Reply
  13. Wedding or Anniversary Card with Cricut » minorDIY says:
    August 17, 2022 at 9:35 am

    […] from the Free Files Folder, then unzip it and upload it to your cutting machine’s software. (Read this tutorial if you need help uploading to Design […]

    Reply
  14. Easy Starter Heart Exploding Box » minorDIY says:
    October 6, 2022 at 2:55 pm

    […] (Click here if you need to see step-by-step instructions for how to upload an SVG to Design Space.) […]

    Reply

What do you think? Cancel reply

This site uses Akismet to reduce spam. Learn how your comment data is processed.

Top Posts & Pages

  • Twist and Pop Birthday Card SVG
    Twist and Pop Birthday Card SVG
  • Looking for free project files to download?
    Looking for free project files to download?
  • How to make a Magical Unicorn Pop-Up Card
    How to make a Magical Unicorn Pop-Up Card
  • Minecraft Father's Day Card
    Minecraft Father's Day Card
  • Cricut Adventure Giveaway
    Cricut Adventure Giveaway
  • How To Make a Gift Box with Pop-Up Cubes
    How To Make a Gift Box with Pop-Up Cubes
  • How to make a Twist n Pop Hug Card
    How to make a Twist n Pop Hug Card
  • Good luck!
    Good luck!
  • Gal-entine Heart Explosion Box
    Gal-entine Heart Explosion Box
  • I was hoping you'd join my crafting community!
    I was hoping you'd join my crafting community!

Recent Posts

  • Twist and Pop Birthday Card SVG
  • Suitcase Photo Explosion Box – Cricut Crafting Adventure Project
  • Camera Mini Photo Album
  • How to change icons for folders or files on your computer
  • Mantle-Worthy Photo Card

Copyright © 2023 · Privacy Policy · Terms and Conditions · Modern Studio Pro on Genesis Framework · WordPress · Log in

8 shares