Learn how to make your Cricut scoring stylus make deeper scorelines in cardstock with this quick tutorial.

During my pop-up card-making workshop, several crafters asked how to make their score lines deeper.
What’s the benefit of a deeper scoreline?
A deeper score line makes it easier to fold the paper along the desired line, as the fibers of the paper have been more deeply separated. This can be especially helpful when working with thicker cardstock or when you want especially crisp, clean folds.
The Cricut scoring stylus doesn’t score as deep as the scoring wheel, but it’s easier and faster to use because you don’t need to switch tools constantly.
A deeper scoreline makes folding and burnishing the cardstock much easier!

Note: You can download the desktop tutorial as a PDF. It’s file #100 – How to make your Cricut score lines deeper in the Free Files Folder.
It’s quick and easy to simply duplicate the score lines in Design Space.
The scoring stylus will go over the line as many times as you duplicate it, while only cutting once.
If you are on a laptop or a computer, you can use the ALT key to duplicate anything in the exact location.
Here’s how to use the ALT key (it’s the Option Key on a Mac) and your mouse to duplicate score lines in Design Space.
First, select the score line by clicking on it.

Now, hold down the ALT key (PC) or Option Key (Mac) on your keyboard. Click your mouse button without moving it.

If you click twice while holding down the ALT key (Option Key on a Mac), the score line will be duplicated twice.
Select all of the score lines and the cut piece below them.
Click on the Attach icon.

If you zoom way in, you can check the position. See how they are precisely on top of each other? That’s what we want.

It’s ready to make. The Cricut will score three times, then cut the piece.
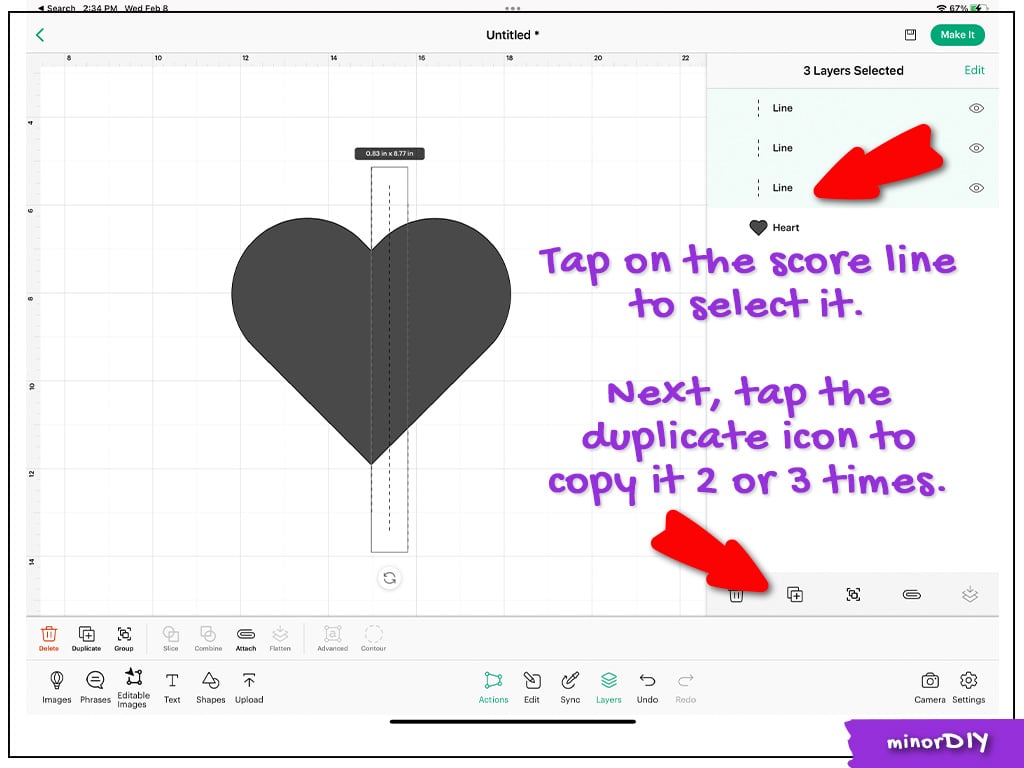
How to duplicate score lines in Design Space on an iPad

Tap on the scoreline to select it.
Now, tap on the Duplicate icon two or three times.
Select all of the scorelines and the cut piece.
Tap on the Edit menu icon.
Tap on the Align icon.
Tap on Center.

The final step is to tap on the Attach button (the paperclip icon.)

I zoomed in here to double-check that it’s all perfectly aligned. Yep!

Is your ALT or OPT key broken? You can also use this method for getting deeper score lines with your Cricut.

Click on the Duplicate icon.

Select everything and Align it.

Now Attach it, as you would any other scoreline.

It’s ready to make!
Now, the scoring stylus will repeat three times in exactly the same location, while only cutting once.
FAQ – getting deeper scorelines with a Cricut
Can’t I just press the flashing “Go” button again, after the first time it cuts and scores?
Yes, you can, but it will repeat everything. If the project draws, scores, and cuts, it would repeat all of that.
If I only want a deeper score, I don’t want to have my Cricut re-draw (making the lines darker and fuzzier) and re-cut because then the cut most likely will be too deep.
Does this work with the scoring wheel too?
Yes, it does. It works with anything you want to duplicate.
You could use it to make just one part of your pen design darker, for example, the first letter of a name. (Duplicate just the first letter, so it draws twice and the rest of the word draws once.)
My friend Jen uses it to make her engraving deeper.
Want to have this tutorial next to your computer for easy reference? The printable is file #100 – How to make your Cricut score lines deeper in the Free Files Folder.
Questions? Leave a comment below.
Don’t want to forget this?
Save it for later by pinning it on Pinterest.
Click the image below to Pin it.

Stephanie M. says
Wow this tip is what I’ve been looking for. It will save me so much time in my card making! Thank you so much for sharing your genius.!!
* remember when one door closes another one opens.. be sure and go through that new door with a whoop whoop!! YOU got this !!
Diane DeBell says
Thank you so much for this tip!!!
Shelley says
Great idea. Now I shouldn’t have to score by hand also, to make the fold crisper.
Kristy says
Thank you so much….you bring such knowledge to our Cricut world. I appreciate how easy you make it to understand. I look forward to seeing your name on the teacher list at the different online venues!
Emily says
Thanks for the kind words, Kristy! I look forward to seeing you there too.
Becky Canada says
Emily, how do you do it on an IPad? Any help would be appreciated. Thank You!
Emily says
I’ll do some screenshots from the iPad. (I really dislike using Design Space on iPad, so I tend to avoid it.) But I can do it when requested. 🙂
Emily says
I’ve updated it Becky!
Becky Canada says
Emily, thank you so much for your time! You are brilliant!
Valda Ritter says
Love it!
Eleanor says
Emily…You Rock!! Best Ever Tip! Thank you so much!
Diane says
Thank you so much Emily, I will put this hack in my notebook for when I get a cutting machine. I love learning things before I spend my money on something I don’t have room for.
Emily says
That’s so smart! Many people get one… and then leave it in the box because they don’t know what to do with it! So learning about them and what they can do is before purchase is so beneficial.
Jane Sillman says
OMG!!!! I even bought a different pen adapter to try to make the score lines deeper, but I never thought of this. Emily, I am so glad I signed up for your newsletter. Thank you so much.
Emily says
You’re welcome! It makes such a big difference.
Shirl says
Brilliant, thank you
anet says
Wow, brilliant. Thank you Emily.
Toni says
Thank you so much this will help me a lot. You have most useful tips.
Kathy Hales says
Wow! I made a few things recently and wished that my score lines were a little better. This makes so much sense! Thank you for a great tip!!!
Emily says
You’re welcome! This definitely will help.
Alison says
Thank you what a great tip
Emily says
You’re welcome! Feel free to ask anytime if you are wondering if there’s a better way to do something.
Martha B says
This will be great for my Explore Air 2.
Emily says
Yes! I use my Explore Air for tons of cardstock too.
Sandy Bingham says
Why didn’t I think of that! Brilliant
Emily says
It’s actually so easy too! The perfect hack.
Shirl Lundstrom says
Wow! Number One tip of the year! Thank you!
Emily says
Thanks Shirl! I’m glad it helps!
Christina Maffia says
Brilliant, Emily! I also use the scoring stylus to save a step.
Emily says
Yes! If I have to change it, I get distracted and step away and I forget to press the button to actually make it go!